.NET Framework と C# と SharpDevelopで Windowsアプリケーションをつくってみる2
ソフトをつくる
.NET Framework と C# と SharpDevelopで Windowsアプリケーションをつくってみる2
さて、環境も整ったところでなにか作ってみようと、ウイザードが作ってくれたファイル をみてみます。 ちなみに、C# も .NET も初体験。できるかどうだか直火焼き。
変数等の命名規約とか知らないので、適当です。すいません....
MainForm.cs
SharpDevelop で、「Windowsアプリケーション」を選択すると次のコードを作成してくれます。 これを手がかりに作ってみます。
// MainForm.cs

using System;
using System.Drawing;
using System.Windows.Forms;

namespace maple4estry
{
/// <summary>
/// Description of MainForm.
/// </summary>
public class MainForm : System.Windows.Forms.Form
{
    public MainForm()
    {
        //
        // The InitializeComponent() call is required for Windows Forms designer support.
        //
        InitializeComponent();

        //
        // TODO: Add constructor code after the InitializeComponent() call.
        //
    }

    [STAThread]
    public static void Main(string[] args)
    {
        Application.Run(new MainForm());
    }
    #region Windows Forms Designer generated code
    /// <summary>
    /// This method is required for Windows Forms designer support.
    /// Do not change the method contents inside the source code editor. The Forms designer might
    /// not be able to load this method if it was changed manually.
    /// </summary>
    private void InitializeComponent() {
        //
        // MainForm
        //
        this.AutoScaleBaseSize = new System.Drawing.Size(5, 12);
        this.ClientSize = new System.Drawing.Size(292, 266);
        this.Name = "MainForm";
        this.Text = "MainForm";
    }
    #endregion
}

}
プログラムは、エントリポイントの Main スタティックメソッドからはじまります。
[System.Windows.Forms.Form] を extend したクラスを、 System.Windows.Forms.Application.Run すると、 Windowsのアプリケーションとして実行されるようです。
[#region Windows Forms Designer generated code] から [#endregion] までは、SharpDevelop のフォームデザイナがいじるところなので、 編集しないようにした方がよさそうです。
自分で自分をつくって、実行が始まっていますが、実験もかねてもう一つ クラスをつくって、そこから MainForm を生成してみます。 追加 - 新しいファイル - クラス で「Maple4estry.cs」を作って次のように してみました。MainForm.cs の Main メソッドはコメントアウトしておきます。
// Maple4estry.cs

using System;
using System.Windows.Forms;

namespace maple4estry
{
/// <summary>
/// Description of Maple4estry.
/// </summary>
public class Maple4estry
{
    MainForm mainForm;

    public Maple4estry()
    {
        mainForm  = new MainForm();
        // イベントループ開始
        Application.Run(mainForm);
        // いらないのかな?
        Application.Exit();
    }

    ‾Maple4estry()
    {
        MessageBox.Show("終了します", "終了", MessageBoxButtons.OK, MessageBoxIcon.None, MessageBoxDefaultButton.Button1);
    }

    [STAThread]
    public static void Main(string[] args)
    {
        new Maple4estry();
    }

}
}
Application.Run(mainForm); で、イベントループが開始されるようです。 ためしに削除し、mainForm.Show(); と変更したところ、一瞬表示されて終了してしまいました。
表示されたフォームの、「×」でアプリケーションの終了をかけると 処理が戻ってきて、Maple4estry のデストラクタが呼び出されることが分かります。 「×」の処理のコーディングはしていないので、.NET Framework が自動でやってくれています。 ソースまで見ていませんが、 .Close() メソッドと同意のようです。
ただ、どちらの終了にしろ、Maple4estryクラスで .Dispose しても、 MainForm のデストラクタは呼び出されないようです。 デストラクタは、あまり使わないという記述もどこかでみたので 使わない方向でいきます。
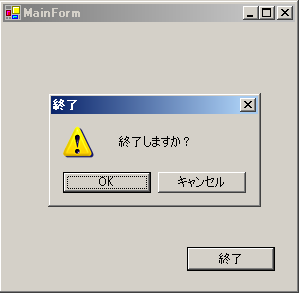
また、「×」で勝手に終了してしまうのも都合が悪いので調べたところ、 ウインドウの終了イベントが ハンドルできるようなので、これを MainForm に追加してみます。
// MainForm.cs

using System;
using System.Drawing;
using System.ComponentModel;
using System.Windows.Forms;

namespace maple4estry
{
/// <summary>
/// Description of MainForm.
/// </summary>
public class MainForm : System.Windows.Forms.Form
{
    private System.Windows.Forms.Button button1;
    public MainForm()
    {
        //
        // The InitializeComponent() call is required for Windows Forms designer support.
        //
        InitializeComponent();

        //
        // TODO: Add constructor code after the InitializeComponent() call.
        //
        this.Closing += new CancelEventHandler(this.MainFormCloseing);
    }
    //[STAThread]
    //public static void Main(string[] args)
    //{
    //	Application.Run(new MainForm());
    //}

    #region Windows Forms Designer generated code
    /// <summary>
    /// This method is required for Windows Forms designer support.
    /// Do not change the method contents inside the source code editor. The Forms designer might
    /// not be able to load this method if it was changed manually.
    /// </summary>
    private void InitializeComponent() {
        this.button1 = new System.Windows.Forms.Button();
        this.SuspendLayout();
        //
        // button1
        //
        this.button1.Location = new System.Drawing.Point(184, 224);
        this.button1.Name = "button1";
        this.button1.Size = new System.Drawing.Size(88, 24);
        this.button1.TabIndex = 0;
        this.button1.Text = "終了";
        this.button1.Click += new System.EventHandler(this.Button1Click);
        //
        // MainForm
        //
        this.AutoScaleBaseSize = new System.Drawing.Size(5, 12);
        this.ClientSize = new System.Drawing.Size(292, 266);
        this.Controls.Add(this.button1);
        this.Name = "MainForm";
        this.Text = "MainForm";
        this.ResumeLayout(false);
    }
    #endregion

    void MainFormCloseing(object sender,CancelEventArgs e)
    {
        DialogResult result =
            MessageBox.Show("終了しますか?",
                    "終了",
                    MessageBoxButtons.OKCancel,
                    MessageBoxIcon.Warning,
                    MessageBoxDefaultButton.Button1
                    );
        switch(result) {
            case DialogResult.OK:
                break;
            case DialogResult.Cancel:
                e.Cancel = true;
                break;
        }

    }

    void Button1Click(object sender, System.EventArgs e)
    {
        this.Close();
    }
}

}
実験のためついでに終了ボタンをつけてみました。

this.Closing += new CancelEventHandler(this.MainFormCloseing);
この行で、終了イベントをハンドルしています。 delegate という仕組みで、 [MainFormCloseing] メソッドにイベントをハンドルしています。 ボタンを押されたときの、[Button1Click] メソッドでは、[this.Close();] として います。
「×」も「終了ボタン」も、終了イベントを発生させ [MainFormCloseing] が 動き出します。
void MainFormCloseing(object sender,CancelEventArgs e)
{
e.Cancel = true;
}
とすると、終了をキャンセルしてイベントループに復帰します。
とりあえず、起動/終了シーケンスが何となく分かりました。
→ .NET Framework と C# と SharpDeveopで Windowsアプリケーションをつくってみる3